Monday, October 29, 2012

Palm Springs

A few weeks ago, my beloved and I had a chance to escape for the weekend to Palm Springs to celebrate our 4th anniversary. And, since, I have a new camera to mess with now, I thought I would just share some pics from our weekend and my attempts at learning how to use this tool of modern technology. 
Bear with me.. I am a complete novice!

It was the best weekend - the weather was warm but not too hot, the food was great, the company was perfect.

We stayed at the Alcazar - a smaller hotel but perfect for our weekend. Very quiet & serene. I highly recommend it for a getaway.
One of the gates at the hotel - beautiful colored glass w/wrought iron
The courtyard had these water walls - they were so cool. 

The pool - very quiet and simple

Alcazar is on Palm Canyon Drive - very centrally located - and within walking distance
to almost everything
Our first stop on Saturday morning was brunch at Pinocchio's. It came highly recommended for its all-you-can-drink mimosas and they definitely delivered!
One of many large art installments along our walk to breakfast
I loved the colors of this bike shop against the mountains & sky

And it was pretty cool in black & white, too!

For our anniversary dinner we ate at Jake's - conveniently located a few doors down from Alcazar. We chose to eat on the patio and it was a great decision. The weather cooled off nicely and just added to our great meal. Note: Jake's is a very small restaurant; make a reservation!


Looking sassy for our date
(Admittedly, not the best photo but the best we could do without
a tripod or a 3rd person to take the picture)
Sunday Morning Brunch was had at Cheeky's - conveniently attached to the front side of Alcazar. The wait is long but the food is worth it. 
Palm Springs is pretty dog-friendly (I think most cities
in Southern California are jumping on this train) but I
just loved how the idea of bringing your pooch
to brunch was so normal. 

You read the paper, they sniff.

This man's pants were so sassy I had to capture their awesomeness. 

The man who puts up with me... and puts up with me
taking like 12 pictures of him in a row while practicing
my skills (or lack thereof)
Isn't he photogenic?!

After looking through these pictures it looks like all we did was eat... which is, in fact, a pretty accurate depiction of our activities that weekend. Having a 2-year old we don't get to eat out much - and if we do we are trying to get in and out as fast as possible. It was great to be able to linger over our leisurely meals, have meaningful conversations and actually enjoy each other - no crayons or kids menus involved.

A perfect anniversary weekend!

Links:
Alcazar Hotel
Pinocchio's
Jake's
Cheeky's

Friday, October 5, 2012

Where are you, Fall?

I don't know about you but I am ready for Fall to get here. 
It is October 5th and we are still wearing shorts and sandals. 
Halloween is a mere 25 days away and no leaves have turned, there is no crispness in the air.
Fall? Are you there?

In my best efforts to will Fall to come I keep making beef stew. I bought a new crockpot on Monday just for the occasion. I've never really been much of a crockpot person - for some reason I can't ever get the food cooked in the crockpot to come out well. Why are the easiest things always so hard for me (see: Rice Crispy Treats)?! 

Then I realized the problem might not be me... but my crock pot. You see, I inherited my first crockpot. from my mom - she had extras (what?!) so she gave me one. It was lovely, decent sized... but always seemed to run a bit hot and would incinerate whatever was in it. I also have a theory that it was, in fact, too big and that worked against me - too much hot surface, not enough food... something like that. 

Wednesday, October 3, 2012

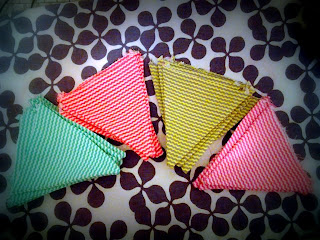
DIY: Festive Birthday Garland

Yes, it's true... on top of baking and cooking... I love to DIY and be all crafty. And now, I am going to share it with you! You lucky dogs!

My birthday was last week and, whereas, my wonderful husband is great and talented at lots of things, creating birthday decorations may not be one of them. So, instead of waiting to find out, I decided to make my own birthday garland to hang up in the living room.
Yay! Cute and festive!

Confession: I love Joann Fabric
I could happily browse the aisles for hours and be happy as a clam. 
The day I went to pick out fabric for my banner all of the fat squares were $1!! Can you believe it?! What luck! So I picked out 4 different patterns for my birthday garland and 5 different patterns for my fall garland (that has yet to be worked on.. sigh). 

This project is actually fairly easy but is not a quick project. I cut all my triangles on one day and then attacked the sewing another. My blocks of time are not always consistent so I take it as it comes. 


FESTIVE TRIANGLE FLAG GARLAND

 As I mentioned previously, the first step is cutting out all your triangles. I just made a triangle shape that I liked out of some cardboard laying around and then marked and cut all my triangles. Don't forget to cut a front &  back for each triangle. 

I cut about 5-6 of each pattern.

 You will edge-stitch down the two long sides of each triangle. I would keep your stitch length pretty short to avoid any side blow-outs. (Or worse - point blow-out!)

I sewed down one side & with the needle down, rotated the triangle to sew back up the other side. I like doing this better than having to lift the needle and reposition the triangle. 
Working smarter, not harder, since 1985. 

 Snip the tip off of your triangle to help cut down on the bulk inside your flag once you flip it right-side-out. Be careful not to cut the stitching!

Turn your triangle right-side-out and with a pen (or similar) push the triangle tip down so all the fabric is flat.

 All my triangles are ready to be pressed!

 Pressing the triangles will definitely help with sewing them. This fabric is 100% cotton so it gets nice and crisp when you press it. This definitely helps when sewing them to the tape. 

  Layout your triangles by color & then you can easily put them in order for sewing. I find it super helpful to have all my triangles in the sewing order before I start sewing. Then you can just grab from the top of the pile without having to worry that you just sewed 2 of the same color in a row. Eek! 

I used 1/4" double-fold bias tape to make the garland. I think 3/8" or 1/2" might be easier (gives you a bit more room at the top to tuck the triangle in) but I went with 1/4" for this project. I liked the "dainty" size of it. For bigger triangles - definitely use a wider tape.

For the first triangle, I found it necessary to pin it in place to start sewing. Leave about 3-4 inches of the tape at the end (for the hanger loop) and then pin the top raw edge into the tape, sandwiching it between the top/bottom. The tape's fold should be facing up. 

 Using a short stitch-length (or SPI for the sewing savvy), edge stitch as close to the bottom side of the taping as possible. Edge-stitching will ensure you catch the whole length of the triangle in the taping. Once you have reached the end of the triangle, continue to sew for about 1/4" then, with the needle down, lift the foot and add your next triangle, sandwiching it in the tape. Put the foot back down and continue sewing until all your triangles are used or until you run out of taping. If it is the latter, be sure to save about 4" at the end of the taping for the hanger loop.

 To create the hanger loop, simply turn back the ends of each side and tack (tack &  back-tack about 3-4 times to ensure stability). 

And there you have it - your very own festive triangle garland!

 It just screams "Happy Birthday," doesn't it?


In case you're wondering, I had a nice birthday. Weekday birthdays are always a bit more subdued but for a Thursday, it was perfect. 

Happy Crafting!

PS: have I mentioned my complete adoration for Martha Stewart? 


Tuesday, September 18, 2012

Baking Healthy

Baking healthy is for the birds.

It's ironic because I am a die-hard Weight Watchers member and fan but one thing I really can't handle is trying to bake healthy. What's the point? Why not just have a nice small piece of the real thing instead of choking down a slightly bigger piece of something that is just so-so?

Against my better judgement I decided to try to bake some "Energy" muffins for the Napa Valley Ragnar Race we ran this past weekend. I looked up a few recipes that I thought might be good - made with things I could pronounce - and found one via Oxygen Magazine that looked decent. The recipe called for all sorts of protein-packed ingredients and mostly yummy things.

The original recipe called for Strawberries as the fruit-of-choice but I decided to change it up and use bananas (potassium!) and cinnamon (always tasty!).

One of the cool things about this recipe is that you basically take all of the ingredients and toss them in a blender to mash up and mix. Then you pour them in the muffin tins and bake. Easy-peasy.

Overall, the muffins came out ok. I say ok because they didn't taste like much. I definitely think i could have easily doubled the cinnamon, added more bananas and maybe added some extra vanilla or something else festive. Maybe some mini chocolate chips! Yeaahhh....


Did these muffins serve their purpose? Yes.
Do I want to try these again? Probably... with some tweaks
Do I condone healthy baking? Not if you can help it... but there is a time and place for everything.

For now, I'll just stick to baking with butter and cream and leave the healthy things to others.

Cheers to the cook!

Oh.. and just because I can... check out the sweet medals we got for finishing our race this weekend. Yep. I wear them all the time.. they go with everything!


Energy Muffins [adapted from Oxygen Magazine]


Ingredients:

 
  • 2 cups egg whites
  • 1 1/2 cups oats or 1 cup instant oatmeal or 1½ cups quick oatmeal
  • 1/2 cup whole wheat flour
  • 1 cup unsweetened applesauce
  • 1 cup 1% cottage cheese
  • 1/2 cup whey protein powder
  • 1 1/2 tsp baking powder
  • 25 almonds
  • 1 tbsp vanilla extract
  • 1/2 tsp almond extract
  • 1/8 tsp or pinch of salt
  • 2 tsp cinnamon
  • 3 very ripe bananas
  • optional add-ins (pick one): 
    • 1 cup of mini chocolate chips 
    • 1 cup of toasted walnuts
    • 1 cup of shredded coconut 

Instructions:


Pre-heat oven to 350˚F. Pour ingredients into a blender and blend until smooth. Mix in fruit by hand, if you want it to remain chunky or include in the blender for smoother texture. Pour into greased muffin tins - I don't suggest using paper liners (the muffins stick to the paper once cooled). Cook until toothpick comes out clean (about 30-40 minutes). Cool on wire rack; store in air-tight container in the refrigerator for up to 5 days.

Monday, August 20, 2012

Project Brownies: S'mores... the Finale

I saved the best for last. 

For all three brownie projects I tried to  "up" the level of the add-ins each time. The Nutella was pretty subtle, the raspberries definitely changed the flavor of the whole brownie.. but these... these are a whole different story. These brownies up the ante. 
Regular Ingredients: Brownie Mix, Water, Eggs, Vegetable Oil
Special Guests: Graham Cracker Crust, Milk Chocolate Chips, Marshmallows

This brownie took a bit of thought before I dove in. I wasn't quite sure exactly how things would work since I was mixing different types of textures and substances together. It sounds a bit like a science project but, in a way, baking is very scientific. 
I decided to start with a graham cracker crust. I used 2 cups of pre-smashed graham crackers +  4 tablespoons of melted butter + 1 tablespoon of sugar for good measure. Mix it all up in a bowl & press into the bottom of a greased 9x13 pan. Bake it for about 10 minutes. 

After you bake the crust, add the regular brownie mix on top. I decided that the brownies alone were not enough "chocolate" for the chocolate layer in a s'more so I poured 1/2 the batter in... then added an entire bag of chocolate chips on top... then added the rest of the brownie batter on top of that. Then I put it in to bake. Note that the baking time for these brownies is going to be a bit longer than the standard 25 minutes. The brownies are not getting the heat from the bottom of the pan the way they would if the crust wasn't there so you'll have to bake it a bit longer. I would suggest to start with 30 minutes and then check it every 3-5 minutes until it is done. 
Eeeeeee! Now the best part!!!!

Once the brownies are done baking, take the pan out of the oven and switch it from "baking" to  "broiler."

Dump about 3/4 of a bag (or more) on top of your brownies and then place the pan under the broiler until your marshmallows are toasted. 
Seriously... this is the most important part. It is what elevates the brownies from good to unreal. The mallows get that caramelized flavor that only fire can provide. They become sweet and chewy and have just an amazing texture. So good.

The tricky part now is getting them cut and out of the pan. I decided to wait until they were completely cooled to try to cut them. It was not easy. The mallows like to stick to everything.... which is what makes them mallows. Anyway - I just powered through and tried to cut slow as to not pull off all the topping. Another suggestion would be to heat up your knife so it melts the marshmallows a bit before cutting - note, you'll probably need to rinse your knife a few times. Another way would be to lightly grease your knife (Pam, or something similar, works well) before cutting. Again, you'll probably have to rinse your knife a few times in the process. 

When all of the cutting is done you are left with a stupendous treat - S'More Brownies. 

Not to sound lame, but you'll definitely want s'more!
(Ok.. I knew it was going to be lame, and it is... but there had to be a s'more joke in there somewhere!!)


Cheers to the Cook!


S'more Brownies

1 box of brownie mix (I used Betty Crocker)

Ingredients for this mix:
2 eggs
1/4 cup water
2/3 cup vegetable oil

2 cups of graham cracker crumbs
4 tbsp unsalted butter, melted
1 tbsp white sugar

1 bag milk chocolate chips

1 bag mini marshmallows

Grease a glass 9x13 pan; heat oven to 350 degrees.

Mix graham cracker crumbs, melted butter & sugar together in a medium bowl. Press into the bottom of your greased pan. Bake for 10 minutes. 

Meanwhile, mix brownie ingredients together in a large bowl with beaters until well combined. Once graham cracker crust has finished baking, empty half of the brownie mix onto the crust.  

Sprinkle chocolate chips on top.

Add the remaining half of the brownie mixture on top.

Bake for abut 30-40 minutes in the oven. Start with 30 minutes and check every 3-5 minutes for doneness. Brownies should be a bit firm to the touch but still quite moist when you take them out of the oven. 

Switch oven from Bake to Broil. Sprinkle marshmallows on top of brownies. Place under the broiler until mallows have achieved desired color. (This is like camp - some people like them barely brown. Some of us like them 2 small steps away from charcoal. Do what you like!)

Leave in the pan to cool.

Cut into desired size using a lightly greased knife & serve warm. Or store in an air-tight container for up to 3 days. Remember not to stack on top of each other or the mallows will all stick together and you'll have one really big s'more brownie... which is... really... bad... because then you'd have to eat... all of it... by yourself.. horrible.. 

Sunday, August 19, 2012

Project Brownies: Raspberry

Project Brownies: Raspberry

Part 2 of my social experiment had me adding fresh raspberries and chocolate chips to our brownie mix. 
 Again, gathered the usual suspects: Mix, Eggs, Water, Vegetable Oil
Added Special Guests: Fresh Raspberries & Chocolate Chips
 Hello, Raspberries!
 Now we will mash you!!
 You could also put them in a blender/chopper.. but I like a little texture so I opted just to mash them up.  Yum!
 I poured half the brownie mix in the greased pan - I opted for placing the fruit in the middle of the brownies so it would stay moist and not get too dried out by the heat of the oven.
 Then, as if raspberries were not enough, I sprinkled some chocolate chips around before spreading the rest of the brownie batter on top. 
 Off to bake!
 Beautiful! One note - I suggest baking these a few minutes longer than you would if you were making plain brownies. For the Nutella Brownies, I think I baked them for abut 25 minutes. For these - I would say at least 27-28 minutes. The fruit adds a bit of extra moisture to the batter and I think it could definitely stand to bake just a touch longer. Mine were pretty gooey... but still delicious... no complaints!
You can actually SEE the raspberries in this bite. Just saying.

Cheers to the Cook!


Chocolate Raspberry Brownies


1 box of brownie mix (I used Betty Crocker)

Ingredients for this mix:
2 eggs
1/4 cup water
2/3 cup vegetable oil

1 package of fresh raspberries
1 cup chocolate chips (I used semi-sweet, but milk chocolate or white chocolate would be amazing, too!)

Grease a glass 9x13 pan; heat oven to 350 degrees.
Mix all above ingredients together in a large bowl with beaters until well combined. 
Empty half of the brownie mix into your greased pan. 

Mash fresh raspberries up with potato masher until they are pretty broken up and spreadable. Carefully spread them on top of brownie mix in the baking pan. Sprinkle 1 cup of chocolate chips on top.

Add the remaining half of the brownie mixture on top.

Bake for abut 27-28 minutes in the oven. Brownies should be a bit firm to the touch but still quite moist when you take them out of the oven. Leave in the pan to cool.

Cut into desired size & serve warm. Or store in an air-tight container for up to 3 days. 

Friday, August 17, 2012

Project Brownies: Nutella

I decided to run a social experiment using brownies. My undergrad degree is in Sociology and are few things I like more than doing social experiments. Ok, that's not true... but they are fun! And what makes them more fun? Brownies, of course!


I will admit for this project I went with box brownies... I am a die-hard "from scratch" kind of person but since the focus of this project wasn't so much the brownie base but the end result I decided to save myself the hassle and just go with a box mix. Don't tell anyone.


Gathering all of the complex ingredients: Mix, Eggs (in one of my new cute bowls!), Water, Vegetable Oil

And today's guest ingredient: Nutella 


Basically I made the brownies as the box directed and before I popped them in the oven, I swirled some Nutella onto the top. 


This is the end result - super delish, hazelnutty brownies. 
And easy-peasy. 

If you're wondering why I am doing this experiment it is because I am curious about a few things: 
1) If people really like brownies with stuff in them - or are most people more prone to like just plain brownies?
2) If they do like additions, what level of additions to they like - this is why this is a 3-part project
3) How many brownies can the people in my office eat before they get sick of them? Just kidding. That could never happen. Who gets sick of brownies?!

Since you're dying to know, the reaction to these brownies was fairly good. People liked the subtle hint of hazelnut that the Nutella added. A few people thought they were really sweet, which they were, but still managed to force them down (wink, wink) so I think they must have been ok. 

Cheers to the Cook!


Nutella Brownies

1 box of brownie mix (I used Betty Crocker)

Ingredients for this mix:
2 eggs
1/4 cup water
2/3 cup vegetable oil

1/3 cup of Nutella

Grease a glass 9x13 pan; heat oven to 350 degrees.
Mix all above ingredients together in a large bowl with beaters until well combined. 
Empty contents of bowl into your greased pan. 

Measure Nutella into a small bowl. Heat in microwave for about 10-15 seconds on half-power (no higher than level 5). Stir and then drop into small spoonfuls around the top of the brownie mixture. 
Using a knife or spatula, swirl Nutella through brownies by doing a zig-zag pattern with the tip of the spatula the whole length of the pan. 

Bake for abut 25 minutes in the oven. Brownies should be a bit firm to the touch but still quite moist when you take them out of the oven. Leave in the pan to cool.

Cut into desired size & serve warm. Or store in an air-tight container for up to 3 days.