Monday, October 29, 2012

Palm Springs

A few weeks ago, my beloved and I had a chance to escape for the weekend to Palm Springs to celebrate our 4th anniversary. And, since, I have a new camera to mess with now, I thought I would just share some pics from our weekend and my attempts at learning how to use this tool of modern technology. 
Bear with me.. I am a complete novice!

It was the best weekend - the weather was warm but not too hot, the food was great, the company was perfect.

We stayed at the Alcazar - a smaller hotel but perfect for our weekend. Very quiet & serene. I highly recommend it for a getaway.
One of the gates at the hotel - beautiful colored glass w/wrought iron
The courtyard had these water walls - they were so cool. 

The pool - very quiet and simple

Alcazar is on Palm Canyon Drive - very centrally located - and within walking distance
to almost everything
Our first stop on Saturday morning was brunch at Pinocchio's. It came highly recommended for its all-you-can-drink mimosas and they definitely delivered!
One of many large art installments along our walk to breakfast
I loved the colors of this bike shop against the mountains & sky

And it was pretty cool in black & white, too!

For our anniversary dinner we ate at Jake's - conveniently located a few doors down from Alcazar. We chose to eat on the patio and it was a great decision. The weather cooled off nicely and just added to our great meal. Note: Jake's is a very small restaurant; make a reservation!


Looking sassy for our date
(Admittedly, not the best photo but the best we could do without
a tripod or a 3rd person to take the picture)
Sunday Morning Brunch was had at Cheeky's - conveniently attached to the front side of Alcazar. The wait is long but the food is worth it. 
Palm Springs is pretty dog-friendly (I think most cities
in Southern California are jumping on this train) but I
just loved how the idea of bringing your pooch
to brunch was so normal. 

You read the paper, they sniff.

This man's pants were so sassy I had to capture their awesomeness. 

The man who puts up with me... and puts up with me
taking like 12 pictures of him in a row while practicing
my skills (or lack thereof)
Isn't he photogenic?!

After looking through these pictures it looks like all we did was eat... which is, in fact, a pretty accurate depiction of our activities that weekend. Having a 2-year old we don't get to eat out much - and if we do we are trying to get in and out as fast as possible. It was great to be able to linger over our leisurely meals, have meaningful conversations and actually enjoy each other - no crayons or kids menus involved.

A perfect anniversary weekend!

Links:
Alcazar Hotel
Pinocchio's
Jake's
Cheeky's

Friday, October 5, 2012

Where are you, Fall?

I don't know about you but I am ready for Fall to get here. 
It is October 5th and we are still wearing shorts and sandals. 
Halloween is a mere 25 days away and no leaves have turned, there is no crispness in the air.
Fall? Are you there?

In my best efforts to will Fall to come I keep making beef stew. I bought a new crockpot on Monday just for the occasion. I've never really been much of a crockpot person - for some reason I can't ever get the food cooked in the crockpot to come out well. Why are the easiest things always so hard for me (see: Rice Crispy Treats)?! 

Then I realized the problem might not be me... but my crock pot. You see, I inherited my first crockpot. from my mom - she had extras (what?!) so she gave me one. It was lovely, decent sized... but always seemed to run a bit hot and would incinerate whatever was in it. I also have a theory that it was, in fact, too big and that worked against me - too much hot surface, not enough food... something like that. 

Wednesday, October 3, 2012

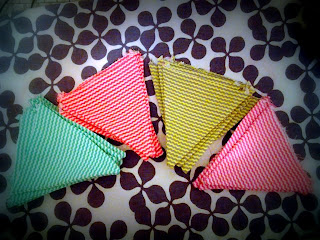
DIY: Festive Birthday Garland

Yes, it's true... on top of baking and cooking... I love to DIY and be all crafty. And now, I am going to share it with you! You lucky dogs!

My birthday was last week and, whereas, my wonderful husband is great and talented at lots of things, creating birthday decorations may not be one of them. So, instead of waiting to find out, I decided to make my own birthday garland to hang up in the living room.
Yay! Cute and festive!

Confession: I love Joann Fabric
I could happily browse the aisles for hours and be happy as a clam. 
The day I went to pick out fabric for my banner all of the fat squares were $1!! Can you believe it?! What luck! So I picked out 4 different patterns for my birthday garland and 5 different patterns for my fall garland (that has yet to be worked on.. sigh). 

This project is actually fairly easy but is not a quick project. I cut all my triangles on one day and then attacked the sewing another. My blocks of time are not always consistent so I take it as it comes. 


FESTIVE TRIANGLE FLAG GARLAND

 As I mentioned previously, the first step is cutting out all your triangles. I just made a triangle shape that I liked out of some cardboard laying around and then marked and cut all my triangles. Don't forget to cut a front &  back for each triangle. 

I cut about 5-6 of each pattern.

 You will edge-stitch down the two long sides of each triangle. I would keep your stitch length pretty short to avoid any side blow-outs. (Or worse - point blow-out!)

I sewed down one side & with the needle down, rotated the triangle to sew back up the other side. I like doing this better than having to lift the needle and reposition the triangle. 
Working smarter, not harder, since 1985. 

 Snip the tip off of your triangle to help cut down on the bulk inside your flag once you flip it right-side-out. Be careful not to cut the stitching!

Turn your triangle right-side-out and with a pen (or similar) push the triangle tip down so all the fabric is flat.

 All my triangles are ready to be pressed!

 Pressing the triangles will definitely help with sewing them. This fabric is 100% cotton so it gets nice and crisp when you press it. This definitely helps when sewing them to the tape. 

  Layout your triangles by color & then you can easily put them in order for sewing. I find it super helpful to have all my triangles in the sewing order before I start sewing. Then you can just grab from the top of the pile without having to worry that you just sewed 2 of the same color in a row. Eek! 

I used 1/4" double-fold bias tape to make the garland. I think 3/8" or 1/2" might be easier (gives you a bit more room at the top to tuck the triangle in) but I went with 1/4" for this project. I liked the "dainty" size of it. For bigger triangles - definitely use a wider tape.

For the first triangle, I found it necessary to pin it in place to start sewing. Leave about 3-4 inches of the tape at the end (for the hanger loop) and then pin the top raw edge into the tape, sandwiching it between the top/bottom. The tape's fold should be facing up. 

 Using a short stitch-length (or SPI for the sewing savvy), edge stitch as close to the bottom side of the taping as possible. Edge-stitching will ensure you catch the whole length of the triangle in the taping. Once you have reached the end of the triangle, continue to sew for about 1/4" then, with the needle down, lift the foot and add your next triangle, sandwiching it in the tape. Put the foot back down and continue sewing until all your triangles are used or until you run out of taping. If it is the latter, be sure to save about 4" at the end of the taping for the hanger loop.

 To create the hanger loop, simply turn back the ends of each side and tack (tack &  back-tack about 3-4 times to ensure stability). 

And there you have it - your very own festive triangle garland!

 It just screams "Happy Birthday," doesn't it?


In case you're wondering, I had a nice birthday. Weekday birthdays are always a bit more subdued but for a Thursday, it was perfect. 

Happy Crafting!

PS: have I mentioned my complete adoration for Martha Stewart?