Showing posts with label decorating. Show all posts

Sunday, November 30, 2014

Decking the Halls: Tree Ornaments

It's late...but Happy Thanksgiving, all!

I am continuously thankful for all 3 of you that continue to read my posts.
But really, I hope that everyone had a very Happy Thanksgiving and that you are blessed with much to be thankful for.

In our house, the turkey-day leftovers are still quite abundant - especially in the potato realm. Why are there SO many potatoes left?! I am actually not a huge potato fan - especially in the mashed form. I am a sucker for a potato chip or a potato french fry... but not so much in mashed form. I have also learned that I am not a fan of the sweet potato (or yam). I just completed my first Whole 30 (I know you're SUPER bummed I didn't blog all about that!) and attempted to work sweet potatoes into my eating habits with no luck. Maybe if I had been allowed to cover them in marshmallows I would have been more inclined, but no dice.

Look at all those leftovers!!

Hmm.. weird potato tangent. Anyway... my point is that we are still working on eating up our leftovers from Thanksgiving as we transition into Christmas season - or Advent.  (And, sadly, we're still finishing up Halloween candy! I think these holidays are too close together!)


Yesterday, as many did, we jumped in our truck to brave the cold Oregon weather to go get our Christmas tree. The spouse and I still have many friends and family in California that had a 70+ degree Thanksgiving... not us. I think it is a brisk 30 degrees out as I am typing & we even had a few flurries yesterday as we were tree-hunting. True winter weather. But we couldn't wait another until another day to get our tree.

As I started to decorate our tree, I started looking through all our ornaments and trying to remember where we had found each ornament, or who had given it to us. Too many times I have skipped over all of the memories & sentiments of our ornament collection - but now my son is starting to understand more about Christmas and the traditions that are such a big part of the meaning of this season, I find myself dwelling over each ornament and its story.

A few to share.

This is the Christmas Pickle. Does your family have a Christmas Pickle? As the history goes, an ornament in the shape of a pickle (so it's not just a clever name) is hidden on the tree and the finder of the pickle is said to be rewarded with a prosperous year. Lucky for me, since I am the one who places the pickle on the tree, I am usually the first to find it... one prosperous year after another.


This little frame was the ornament I bought the first Christmas after we got married. It doesn't need much explanation - it's one of my favorite pictures from our big day. Bonus - the spouse looks like a Beatle.
(Apologies for it being sort of fuzzy...)


The soccer-playing penguin. This ornament is the Spouse's. I decided to include it for 3 reasons: 1. his mom gave it to him when he was in college, 2. it has survived this long and 3. I like this one better than the Ninja Turtle ornament, which was the other option.


I bought this Sparkle Acorn last year for our first Christmas in Portland. Simple and sparkly - just like me.


Finally, this ornament was given to us by my mother-in-law last year. She always gets us these cute personalized ornaments every year.  This one is one of my favorites.


What are your favorite ornaments? And what fun stories do they tell?

I'm excited to keep growing our collection with new ornaments and new memories. I know, I sound like a silly Hallmark commercial, but it's true.

Stay tuned for my next posts: Why Everything Must Sparkle and How Many Lights Can We Possibly Put Up?


XOXO
Amy


Sunday, February 3, 2013

Lepper Colony Etsy Shop

It is official - I am a shop!

I opened my Etsy shop last week and it has been going so well - I made 3 sales within my first few days!

I currently only have a few things on my site but I am bound and determined to fill it up with awesomeness as soon as I can.

I pinky-promise that I will not incessantly post updates on my shop or its contents but I couldn't help but announce it's birthday.

Feel free to stop by... here is the address: Lepper Colony Etsy Shop

And... here are a few items currently in there. More to come... Promise. I love holidays so there will always be holiday goodies available!


Thanks for stopping by!!

Wednesday, October 3, 2012

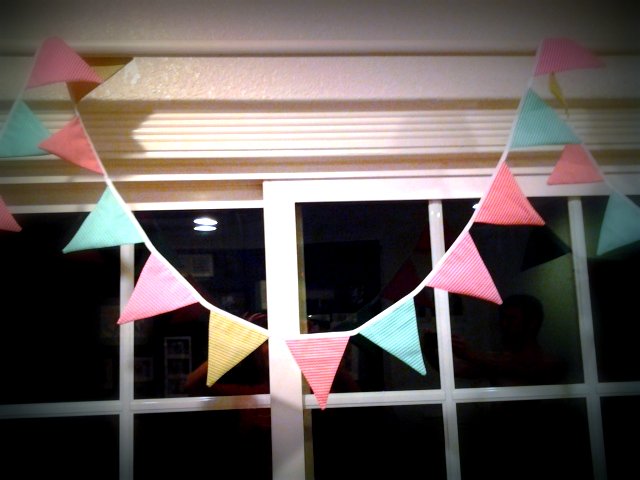
DIY: Festive Birthday Garland

Yes, it's true... on top of baking and cooking... I love to DIY and be all crafty. And now, I am going to share it with you! You lucky dogs!

My birthday was last week and, whereas, my wonderful husband is great and talented at lots of things, creating birthday decorations may not be one of them. So, instead of waiting to find out, I decided to make my own birthday garland to hang up in the living room.
Yay! Cute and festive!

Confession: I love Joann Fabric. 
I could happily browse the aisles for hours and be happy as a clam. 
The day I went to pick out fabric for my banner all of the fat squares were $1!! Can you believe it?! What luck! So I picked out 4 different patterns for my birthday garland and 5 different patterns for my fall garland (that has yet to be worked on.. sigh). 

This project is actually fairly easy but is not a quick project. I cut all my triangles on one day and then attacked the sewing another. My blocks of time are not always consistent so I take it as it comes. 


FESTIVE TRIANGLE FLAG GARLAND

 As I mentioned previously, the first step is cutting out all your triangles. I just made a triangle shape that I liked out of some cardboard laying around and then marked and cut all my triangles. Don't forget to cut a front &  back for each triangle. 

I cut about 5-6 of each pattern.

 You will edge-stitch down the two long sides of each triangle. I would keep your stitch length pretty short to avoid any side blow-outs. (Or worse - point blow-out!)

I sewed down one side & with the needle down, rotated the triangle to sew back up the other side. I like doing this better than having to lift the needle and reposition the triangle. 
Working smarter, not harder, since 1985. 

 Snip the tip off of your triangle to help cut down on the bulk inside your flag once you flip it right-side-out. Be careful not to cut the stitching!

Turn your triangle right-side-out and with a pen (or similar) push the triangle tip down so all the fabric is flat.

 All my triangles are ready to be pressed!

 Pressing the triangles will definitely help with sewing them. This fabric is 100% cotton so it gets nice and crisp when you press it. This definitely helps when sewing them to the tape. 

  Layout your triangles by color & then you can easily put them in order for sewing. I find it super helpful to have all my triangles in the sewing order before I start sewing. Then you can just grab from the top of the pile without having to worry that you just sewed 2 of the same color in a row. Eek! 

I used 1/4" double-fold bias tape to make the garland. I think 3/8" or 1/2" might be easier (gives you a bit more room at the top to tuck the triangle in) but I went with 1/4" for this project. I liked the "dainty" size of it. For bigger triangles - definitely use a wider tape.

For the first triangle, I found it necessary to pin it in place to start sewing. Leave about 3-4 inches of the tape at the end (for the hanger loop) and then pin the top raw edge into the tape, sandwiching it between the top/bottom. The tape's fold should be facing up. 

 Using a short stitch-length (or SPI for the sewing savvy), edge stitch as close to the bottom side of the taping as possible. Edge-stitching will ensure you catch the whole length of the triangle in the taping. Once you have reached the end of the triangle, continue to sew for about 1/4" then, with the needle down, lift the foot and add your next triangle, sandwiching it in the tape. Put the foot back down and continue sewing until all your triangles are used or until you run out of taping. If it is the latter, be sure to save about 4" at the end of the taping for the hanger loop.

 To create the hanger loop, simply turn back the ends of each side and tack (tack &  back-tack about 3-4 times to ensure stability). 

And there you have it - your very own festive triangle garland!

 It just screams "Happy Birthday," doesn't it?


In case you're wondering, I had a nice birthday. Weekday birthdays are always a bit more subdued but for a Thursday, it was perfect. 

Happy Crafting!

PS: have I mentioned my complete adoration for Martha Stewart? 


Sunday, July 17, 2011

My new garden

We have been working hard on trying to get our yards put back together after a year-long sprinkler project. My husband has been slaving away installing new sprinklers, laying sod, sorting gravel, building retaining walls... and my contribution is a cinder block succulent garden that is on our front stoop. Not quite as impressive as laying 1200 sq feet of sod but who's keeping score? Not me! 

Maybe I'll be fair & show you the finished backyard too.... but not yet.. let's bask in my garden just a little longer...

Friday, July 16, 2010

Nesting, Phase 1

I think it's officially time I started nesting. Or so I'm told. I don't really want to spend my weekends cleaning and painting, etc but I suppose the poor guy deserves his own room and deserves it at least somewhat put together. So, I've started planning.

First we have to get rid of the furniture that is currently occupying Flash's room. Good-bye Craft Room... it was nice to have you for the last year. See you in the garage. Next, we need to paint. When we bought our house last year all the bedrooms were painted in this lovely ace bandage-colored hue. We managed to paint our bedroom but have left the other 3 alone for the time-being. So, Flash's room will get a nice coat of white paint.

White? you say? But that's so boring! Let me explain to you... I've been reading about this & baby's can really only see black, white & red for a while so I'm just being sensitive to that. Plus, I figure he'll have an opinion in a couple years and we can paint his room to his liking then. Until that time, Mama wants a nice clean, white room. There is a lot of natural light in there & white will make it lovely.

As far as "theme" there really isn't one. No zoo animals or baseballs or other weird boy things. Our baby is far beyond that :) Afterall, coming from artsy parents, he'll have much higher design goals than an oversized soccer ball on the wall. Bleh! So, I've been looking for some design inspiration from 2 of my fav blogs: Decor8 and Style Files. Love. And they've been oh-so-gracious with said inspiration. In addition to white walls I am also adding accents of a couple blue tones (one jewel and one a bit more subtle) and greys.

I've found Kat at Hearts and Crafts to make me some custom paper garlands for the walls - I love these. So simple but yet so fun! It's like a party all the time!


And I am eyeballing this paper crane mobile as well as this poster. Cranes are a symbol of loyalty & peace and I think those are perfect themes for our baby's room.


Next on the agenda is finding a dresser and building (or I suppose buying) some bookshelves. I found a picture of some that I like and am trying to commission my husband and father-in-law to build them for me but not sure I'll get them. *sigh* One can always hope.


Happy Friday everyone! Here's to spending a very hot weekend converting a craftroom into Flash's room!